Sidecars and RAW: the .xmp next to your file
Cameras can save photos that have been compressed and processed within the camera itself. This offers many advantages, including smaller files, convenience, and quick access to presentable images. However, those who want to squeeze every last bit of quality out of their photos often use the camera's raw data. Based on the English term for “raw” or “unprocessed,” these files are generally referred to as RAW files.
There are different RAW formats. If you own a Nikon camera, RAW files usually have the extension “.NEF”; for Canon, it's “.CR3”; for Sony, “.ARW”; and so on. Each of these file extensions identifies a specific format (many camera manufacturers have multiple such formats, depending on when the camera was manufactured or the type of camera the files come from).
DNG files play a special role. They use a RAW format for digital image data (“Digital Negative”) developed by Adobe more than 20 years ago. It is an open standard for storing the raw data of an image. Some manufacturers now support saving image data directly in the DNG format, but manufacturer-specific RAW files can also be converted to DNG afterward (for example, Adobe Lightroom offers the option to convert RAW files to DNG directly upon import).
Image file formats such as JPEG, HEIC, TIFF, and DNG offer the advantage that metadata can be written to the file, even after the fact. This metadata can include keywords, ratings, details about the image editing steps, the photographer's copyright information, etc.
The situation is different for manufacturer-specific RAW files.
Why a RAW file ends up with a second file
The original purpose of RAW files was to store the unprocessed, unalterable raw data from the image sensor, which means that, by design, these files cannot be modified after the fact. In this case, anything that is to be added later must be saved alongside the photo. The workflow for editing manufacturer-specific RAW files therefore differs, at least from a technical standpoint, from that for editing DNG, JPEG, and other file types that can store metadata directly within the image file.
Different photo editors store metadata in different ways. This can be in a database or directly within the image files; in the latter case, so-called XMP sidecars are used for RAW files. XMP was also developed by Adobe and has since been published as an ISO standard. The abbreviation XMP is derived from the term “Extensible Metadata Platform.” XMP sidecars are files that are saved in the same folder as the image files and are given the same filename, but with a different file extension. The division of labor, taking a photo and saving it as a file, as well as editing the photo and adding additional information, means a RAW capture ends up as two files. While this allows the RAW files to remain unchanged, you must ensure that the two files are not separated. When moving, copying, or sending the files, the XMP file must not be forgotten; otherwise, the work you put in is lost.
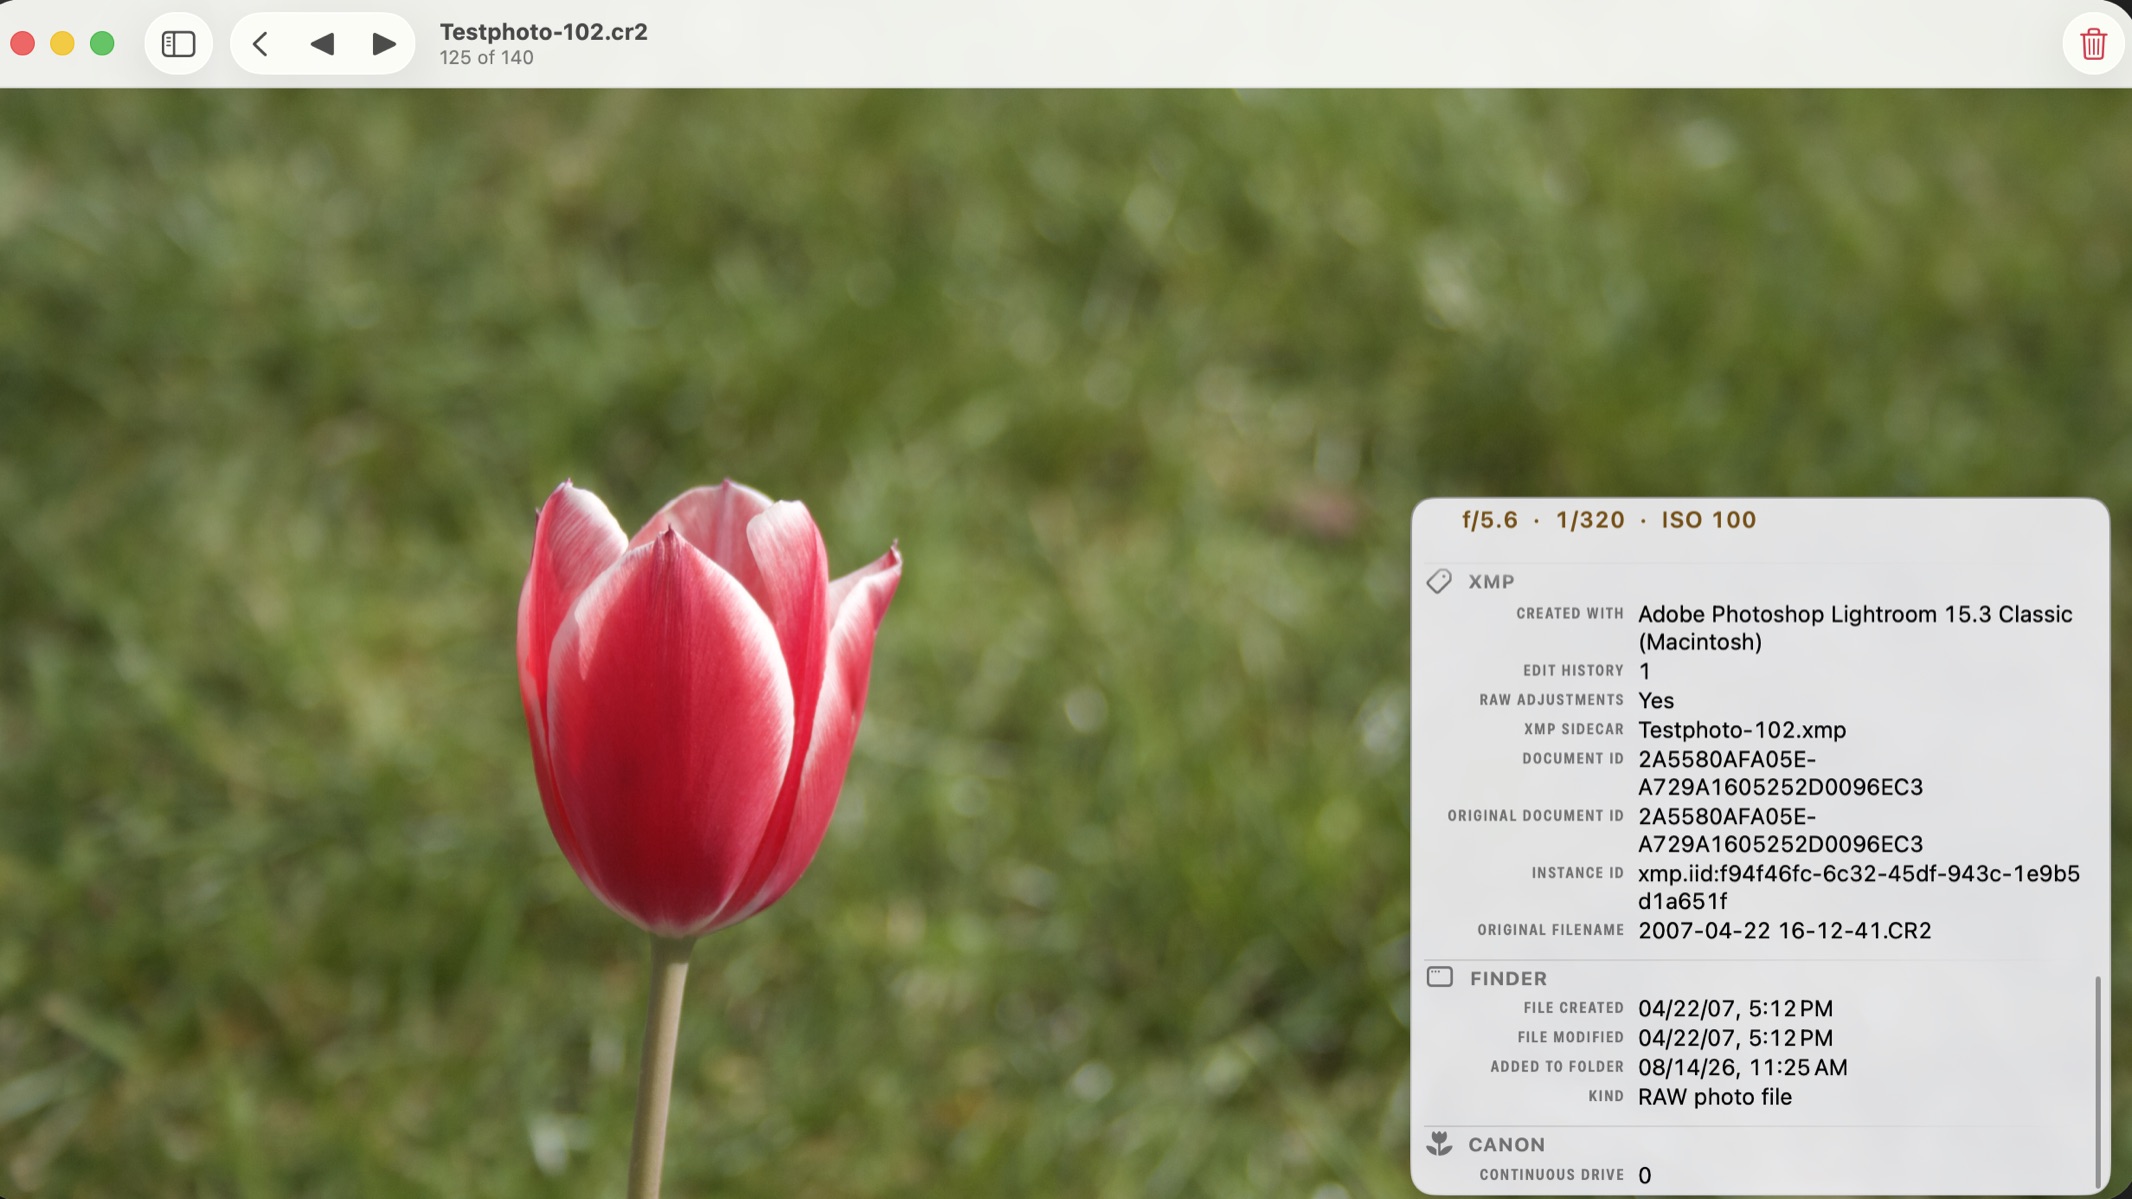
PhotoView reads metadata directly from image files and, on the Mac, also from existing XMP files. The metadata can then be shown or hidden as an overlay for each photo with a tap or click.
Due to system limitations, there are no XMP files in the photo library on the iPhone and iPad; therefore, these files are only read on the Mac, if available.
Two naming conventions, both read
The XMP standard recommends using the same filename, but replacing the file extension with “xmp” for the XMP file. For an image file named “Image_0001.NEF,” the metadata is written to a file named “Image_0001.xmp”.
In practice, there are also photo editors that append the “xmp” extension to the entire filename. This results, for example, in a file named “Image_0001.NEF.xmp”.
PhotoView searches for both variants and, in case-sensitive file systems, also for the file extension “.XMP”. In accordance with standard conventions, the XMP file is always searched for in the same file system folder as the image file. If an XMP file is found, its name is included in the metadata available in PhotoView and is displayed in the “XMP sidecar” field. This makes it easy to determine whether an XMP file has been read without first having to check whether the file is even present in the image folder.
Which source wins
PhotoView reads metadata in three steps:
- The image file information that can be read via the Apple system library interfaces (EXIF, IPTC, GPS, TIFF, DNG, as well as manufacturer-specific information for some cameras, known as “Maker notes”).
- If there are embedded XMP packets in the image file, these are also read. This data is used to fill in gaps from step 1. This means that if data for a field was already found in step 1, it will not be overwritten in step 2.
- If an XMP sidecar is present, it is read in the third step. Since the most recent information is written to the XMP file during RAW processing, this data is considered authoritative. This means that, in the event of a conflict, data from the XMP sidecar overrides information from steps 1 or 2.
What comes out of the sidecar
The following data, if available, is read from the XMP file:
- Star rating, color label and flag (the “Approved” / “Select” style marks).
- Hierarchical keywords, shown as a path, e.g. Travel › Iceland › Reykjavík.
- Headline, caption, creator, copyright, usage terms, rights URL, rights owner.
- “Created with”: the application and version that wrote it.
- Edit history as a count of recorded steps, and a flag that develop / RAW adjustments are stored (not a dump of hundreds of internal values).
- IPTC Extension and PLUS licensing fields: event, people/organizations/products shown, releases, licensor, the copyright-owner chain, the data-mining permission.
- Digital source and AI fields (including AI system, prompt and prompt writer), drone telemetry, 360° and panorama flags.
- The filename of the XMP file that was read, in the “XMP sidecar” field.
The data from the XMP sidecars and the XMP data from any XMP packets embedded in the image file are processed by the same algorithm and displayed in the same fields, regardless of which of the two sources they come from.
DNG files and Maker notes
Some camera manufacturers now save RAW files in the DNG format by default or as an option: Leica, Pentax/Ricoh, Hasselblad for numerous medium-format cameras, and DJI for many drones. Smartphone manufacturers also use DNG; for example, the file format for Apple ProRAW photo files is DNG. Many popular photo editors and RAW converters can save edited images as DNG files or convert proprietary RAW files to DNG (Adobe Lightroom, DxO PhotoLab, Luminar Neo, etc.).
The files contain a block of DNG information that PhotoView can read and display in a corresponding group within the metadata. This includes:
- DNG version and DNG backward version
- Unique camera model and Localized camera model
- Camera serial (DNG)
- Lens info (DNG)
- Black level and White level
- Baseline exposure, Baseline sharpness and Baseline noise
- Shadow scale
- Camera profile and Profile copyright
- Calibration illuminant 1 and 2
- Colorimetric reference
- Original raw file
- Noise reduction applied
- Profile embed policy
- Preview created with
- Raw data ID
However, some information from the DNG block is intentionally omitted because it does not contain data that is meaningfully usable by a human reader (calibration tables, color matrices, etc.).
In addition to the information from the DNG block, PhotoView also reads data from the “Maker notes” of certain manufacturers, specifically Apple, Canon, and Nikon. However, undocumented data fields are not guessed at or determined through extensive testing; instead, they are omitted. Apple does not provide documented fields for the Maker notes of other manufacturers, so these are excluded.
Opening image files and XMP files on a Mac
You can open individual files or entire folders using the standard Mac shortcut ⌘O. Drag-and-drop from the Finder also works. Folders are scanned for media files (photos, Live Photos, and videos), which are then displayed sorted by date. Only the folder itself is scanned; subfolders are not included.
When working with RAW files, it is recommended to always open the folder or transfer the files via drag-and-drop. This ensures that XMP files are found and read as well. If a single file is opened, PhotoView only has access to that specific file; any XMP file that may exist would not be readable by the app using this method. If the XMP sidecar information is missing from a photo's metadata, this is the most common cause; alternatively, the data field may not be included in the list of metadata to be displayed (the list can be configured under Settings ▸ Metadata).
For files opened via ⌘O or drag-and-drop, the metadata in PhotoView also includes information from the Finder: Kind, the file dates, where the file came from, and any comments and tags assigned in the Finder.
By the way, PhotoView remembers which files and folders have been opened. This means that an open folder will still be visible the next time you launch the app.
In the thumbnail grid, the thumbnails for RAW files come from the embedded previews. This avoids having to decode the entire (usually very large) RAW files, keeps response times short, and enables smooth scrolling.
On iPhone and iPad
XMP data embedded in image files (known as XMP packets) can also be read on the iPhone and iPad; this is not limited to the Mac. Reading XMP files is only available on the Mac, since the iPhone and iPad read photos from the library, which does not support XMP sidecars. Consequently, PhotoView can display the embedded XMP data on all three device types, but it can only access the information from XMP files when the app accesses folders directly, that is, on the Mac.
Read only, and only on your device
Everything is read locally on your device. If a photo is stored in iCloud, the system downloads it as soon as you open it in PhotoView. PhotoView does not write any data to your photos: neither to the RAW file, nor to the XMP sidecar, nor to the information from the Finder. Except for the optional synchronization of your settings via iCloud, nothing is uploaded anywhere.
If you're interested in which Apple framework is used to read the metadata, you can find the details in PhotoView reads the XMP your editor wrote.
How to try it
Updated on September 22, 2026: The public beta has ended. From September 29, 2026, PhotoView is available on the App Store for iPhone and iPad and on the Mac App Store. Until then, you can pre-order it.


The full set of supported metadata is part of PhotoView Pro. The App Store version includes a free 7-day Pro trial that unlocks all data. When the trial ends, the basic data stays free and the Pro data is locked again. Nothing is charged automatically at the end of the trial. Pro is a one-time purchase: you pay once and get the current and future versions for Mac, iPhone and iPad.
If you have any questions, you can find my contact information on the Contact page. There you will also find a link to the PhotoView user guide.
← Back to the blog